Microscopy
Microscopy
1) Bright Field Microscopy
Objective: To understand the principles, components, and applications of bright field microscopy, a fundamental tool in biological and medical research for observing stained or naturally pigmented specimens.
Introduction:
Bright field microscopy is the simplest and most commonly used type of light microscopy. It works by passing light through a specimen, with the light either being absorbed, transmitted, or scattered by the specimen’s structures. The contrast between the specimen and the surrounding medium allows for the visualization of the specimen’s details. Bright field microscopy is particularly effective for viewing stained specimens, where different components of the sample absorb different wavelengths of light, providing the necessary contrast for detailed observation.
Principle:
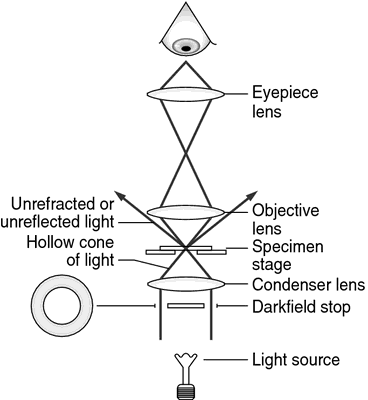
In bright field microscopy, a specimen is illuminated by light from below the stage. The light passes through the specimen and is then focused by the objective lens to produce a magnified image. The image is then further magnified by the eyepiece lens before being observed by the viewer. The contrast in the image is primarily due to the differential absorption or scattering of light by different parts of the specimen.
Components of a Bright Field Microscope:
1. Light Source: Provides illumination for the specimen. It is usually a halogen or LED lamp located beneath the stage.
2. Condenser: A lens system that focuses light from the light source onto the specimen. It often includes an iris diaphragm to control the amount of light that reaches the specimen.
3. Stage: The platform where the slide containing the specimen is placed. The stage typically has clips or a mechanical holder to secure the slide.
4. Objective Lenses: A series of lenses located near the specimen that magnify the image. Most bright field microscopes have multiple objective lenses of varying magnifications (e.g., 4x, 10x, 40x, 100x).
5. Eyepiece (Ocular Lens): The lens through which the observer views the magnified image. The eyepiece typically provides additional magnification (commonly 10x).
6. Focus Knobs:
Coarse Focus: Used for general focusing, moves the stage or the objective lenses rapidly.
Fine Focus: Used for precise focusing, moves the stage/objective lenses more slowly.
7. Nosepiece: A rotating turret that holds the objective lenses and allows the user to switch between different magnifications.
8. Diaphragm and Filters: Control the amount and quality of light reaching the specimen, enhancing contrast and resolution.
Procedure:
1. Preparation of the Specimen: Place the specimen on a glass slide and cover it with a coverslip. If the specimen is not naturally pigmented, stain it using an appropriate dye to enhance contrast.
2. Setting Up the Microscope: Turn on the light source and adjust the intensity as needed. Place the slide on the stage and secure it with the stage clips.
3. Adjusting the Condenser: Center the condenser and adjust its height so that it focuses light onto the specimen. Adjust the iris diaphragm to control the light intensity.
4. Focusing the Image: Start with the lowest magnification objective (e.g., 4x or 10x) and use the coarse focus knob to bring the specimen into view. Switch to higher magnification objectives as needed and use the fine focus knob to sharpen the image.
5. Observation: Observe the specimen through the eyepiece, making adjustments to the focus, light intensity, and diaphragm as needed to optimize the image quality.
6. Recording Observations: Draw or photograph the observed structures, noting the magnification used.
Applications:
1. Histology and Cytology: Bright field microscopy is commonly used to examine tissue sections and cell smears that have been stained with dyes such as hematoxylin and eosin (H&E).
2. Microbiology: Bacteria, fungi, and other microorganisms can be visualized after staining (e.g., Gram staining for bacteria).
3. Parasitology: Detection and identification of parasites in blood, stool, or tissue samples.
4. Clinical Diagnostics: Used in pathology labs for diagnosing diseases based on tissue or cell
morphology.
5. Botany: Observation of plant cell structure, including chloroplasts, cell walls, and vacuoles.
∙ Simplicity: Easy to use and requires minimal sample preparation.
∙ Wide Application: Suitable for a variety of biological specimens, particularly when stained.
∙ Cost-Effective: Less expensive compared to more advanced microscopy techniques.
Limitations:
∙ Low Contrast: Unstained or poorly stained specimens may be difficult to see.
∙ Limited Resolution: Cannot resolve structures smaller than 0.2 µm, such as viruses.
∙ Specimen Damage: High-intensity light can damage live specimens over time.
Conclusion:
Bright field microscopy is a fundamental technique in biological sciences, offering a straightforward and effective way to observe a wide range of specimens. Despite its limitations in contrast and resolution, it remains an essential tool for many laboratory applications, particularly when used with appropriate staining methods to enhance visibility and detail.
2) Phase Contrast Microscopy
Overview: Phase contrast microscopy is a technique used to enhance the contrast of transparent and unstained specimens, making it easier to observe details that are not visible with bright field microscopy. It is particularly useful for studying living cells and tissues where staining might not be desirable or possible.
Principle:
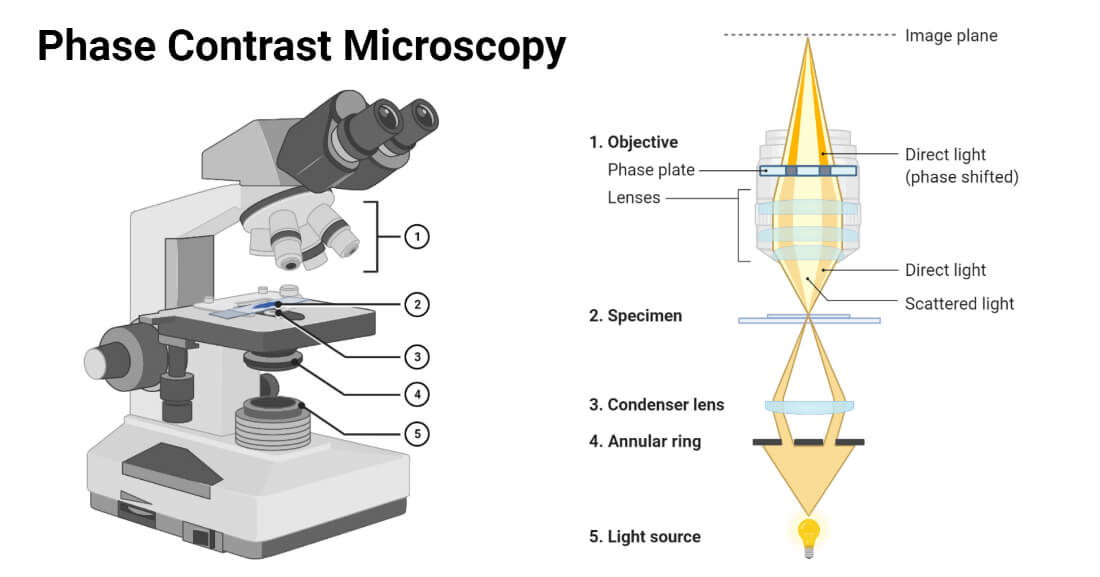
Phase contrast microscopy works by converting phase shifts in light waves passing through a transparent specimen into changes in brightness. When light passes through different parts of a specimen, it is refracted by different degrees depending on the optical density of the specimen's components. Phase contrast microscopy uses special optical elements to amplify these phase shifts, creating a contrast between different parts of the specimen.
Components:
1. Light Source: Provides the illumination for the specimen. Usually a halogen or LED lamp.
2. Condenser: Contains a phase plate and annular diaphragm to create a ring of light that passes through the specimen.
3. Phase Plate: A specialized optical element that introduces a phase shift in the light passing through the specimen. It converts phase differences into amplitude differences, enhancing contrast.
4. Objective Lenses: Phase contrast objectives are equipped with phase rings that work in conjunction with the phase plate to detect phase shifts.
5. Eyepiece (Ocular Lens): Magnifies the image viewed by the observer. It often works in tandem with the phase contrast system.
6. Nosepiece: Holds and rotates the objective lenses.
7. Phase Contrast Rings: Present in both the condenser and objective lenses, these rings are essential for creating the phase contrast effect.
Procedure:
1. Preparation of the Microscope: Turn on the light source and adjust its intensity. Set the phase contrast condenser to the appropriate phase contrast setting for the objective lens being used.
2. Setting the Phase Contrast: Align the phase contrast components by using the phase contrast alignment controls on the microscope. This involves centering the annular ring of light in the condenser and aligning it with the phase ring in the objective lens.
3. Prepare the Specimen: Place the specimen on the stage. Since phase contrast microscopy does not require staining, living or unstained samples can be observed.
4. Adjust the Condenser: Position the condenser so that the annular ring of light is focused on the specimen.
5. Focus the Image: Start with a lower magnification objective. Use the coarse and fine focus knobs to bring the specimen into view. Switch to higher magnifications as needed and fine-tune the focus.
6. Observation: View the specimen through the eyepiece. The phase contrast effect will make transparent structures, such as cell membranes, organelles, and inclusions, more visible.
7. Recording Observations: Document observations or capture images using appropriate imaging equipment.
Applications:
1. Cell Biology: Observing cells, and their internal structures and dynamics, without staining.
2. Microbiology: Studying microorganisms, in their natural, unstained state.
3. Developmental Biology: Monitoring cell division and development in embryos or cultured cells.
4. Pharmacology: Evaluating the effects of drugs on living cells and tissues.
5. Medical Research: Investigating cell morphology, behavior, and interactions in research settings.
Advantages:
∙ Non-Destructive: Allows observation of living cells without staining or other preparations that might alter the specimen.
∙ Enhanced Contrast: Improves visibility of transparent structures that are difficult to see with bright field microscopy.
∙ Dynamic Studies: Suitable for studying dynamic processes in living cells, such as motility and division.
Limitations:
∙ Complex Setup: Requires careful alignment and calibration of optical components for optimal results.
∙ Halo Artifacts: Can produce halo effects around edges of structures, which might complicate interpretation.
∙ Resolution Limitations: While it enhances contrast, it does not improve resolution beyond the limits of the objective lenses.
Conclusion:
Phase contrast microscopy is a powerful technique for observing transparent and living specimens without the need for staining. By converting phase shifts into changes in brightness, it enhances contrast and allows detailed examination of cellular and subcellular structures. Despite its limitations, phase contrast microscopy is invaluable in various fields of biological research and clinical diagnostics, providing insights into the dynamic processes of living cells and tissues.
3) Fluorescence Microscopy
Overview: Fluorescence microscopy is a technique used to observe and analyze specific structures within cells and tissues by detecting the fluorescence emitted by fluorescently labeled molecules. It provides high contrast and sensitivity, making it ideal for studying a wide range of biological processes at the molecular level.
Principle:
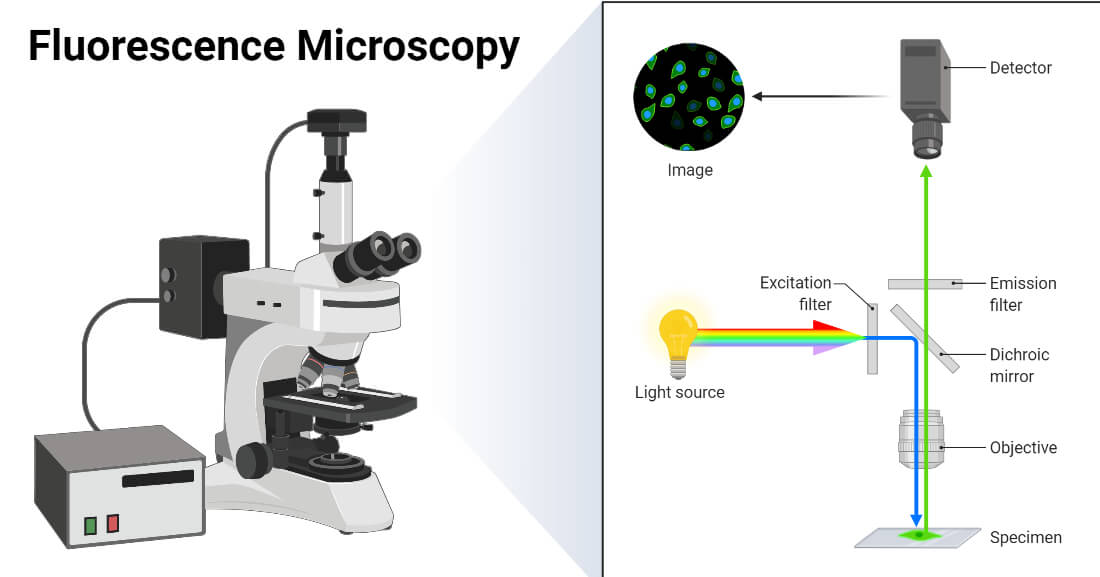
Fluorescence microscopy relies on the principle of fluorescence, where certain molecules (fluorophores) absorb light at a specific wavelength and re-emit it at a longer wavelength. By using specific excitation and emission filters, the microscope can isolate the fluorescent signal from the background and visualize the labeled structures.
Components:
1. Light Source: Typically a high-intensity light source such as a mercury or xenon lamp, or LED. It provides the excitation light needed to excite the fluorescent dyes.
2. Excitation Filter: A filter that selects the wavelength of light used to excite the fluorophores in the specimen.
3. Dichroic Mirror: Reflects the excitation light towards the specimen and transmits the emitted fluorescence light to the detector.
4. Objective Lenses: Designed to collect both the excitation light and the emitted fluorescence. Special objectives with high numerical aperture are often used to capture the fluorescence efficiently.
5. Emission Filter: A filter that isolates the emitted fluorescence light from the excitation light, allowing only the fluorescence signal to reach the detector.
6. Detector: Often a camera or photomultiplier tube (PMT) that captures the emitted fluorescence and converts it into a digital image.
7. Stage and Microscope Body: Holds the specimen and contains the optical components. The stage may have adjustments for precise positioning of the specimen.
Procedure:
1. Preparation of the Specimen: Label the specimen with fluorescent dyes or tags. These dyes bind to specific molecules or structures within the cells or tissues.
2. Setting Up the Microscope: Install the appropriate excitation and emission filters based on the fluorophore used. Adjust the light source intensity and the settings on the detector.
3. Positioning the Specimen: Place the specimen on the stage and focus using the objective lenses.
4. Exciting the Fluorophores: Use the excitation light to excite the fluorophores in the specimen. The fluorophores will absorb the light and emit fluorescence at a longer wavelength.
5. Detecting and Capturing the Fluorescence: The emitted fluorescence light passes through the emission filter and is detected by the camera or PMT. Capture images or video of the fluorescent signals for analysis.
6. Analysis: Analyze the fluorescence images to study the distribution, localization, and interactions of specific molecules or structures.
Applications:
1. Cell Biology: Labeling specific organelles, proteins, or nucleic acids to study their localization and dynamics within cells.
2. Molecular Biology: Investigating interactions between molecules (e.g., using FRET - Förster Resonance Energy Transfer).
3. Medical Research: Detecting specific biomarkers or pathogens in tissues and cells.
4. Neuroscience: Visualizing neural activity and connections using fluorescent probes.
5. Developmental Biology: Studying gene expression patterns and developmental processes in embryos.
Advantages:
∙ High Sensitivity: Can detect low levels of specific molecules due to the high contrast provided by fluorescence.
∙ Specificity: Allows for the visualization of specific cellular components through the use of targeted fluorescent labels.
∙ Dynamic Imaging: Capable of capturing real-time processes and changes within living cells.
Limitations:
∙ Photobleaching: Fluorophores may lose their fluorescence over time due to prolonged exposure to light.
∙ Phototoxicity: High-intensity excitation light can damage or alter living cells.
∙ Complexity: Requires careful setup and calibration, including the selection of appropriate filters and fluorophores.
Conclusion:
Fluorescence microscopy is a powerful imaging technique that provides detailed and specific information about the molecular and cellular structures within a specimen. By using fluorescent labels and specialized optical components, researchers can gain insights into a wide range of biological processes, from cellular functions to complex interactions between molecules. Despite its limitations, fluorescence microscopy remains an essential tool in modern biological and medical research.

Comments
Post a Comment